Lightboxes are used to group files together. Registered users can have many lightboxes and they can send lightboxes to anyone with a built-in e-mail function (Shared lightboxes). All users can invite others to work with them on lightboxes with the Lightbox collaboration function. Staff members can also copy files to lightboxes, and copy entire lightboxes into other user’s accounts. Staff members can also use their own lightboxes to collect files that they want to add to a user’s order or cart. For more information for staff members, read the articles Working with client lightboxes and Preview page user actions.
Recommended reading
Functions
You can add files to a current (active) lightbox with the buttons that appear underneath the thumbnails on search and gallery pages. If you have enabled the “bulk add” buttons (see below) on the gallery pages and/or on the search results pages, you’ll also be able to add many files at once.
Other lightbox functions allow you to copy or move files from one lightbox to another lightbox, to edit notes, to rename a lightbox, to delete it, empty it, to rearrange the order of display and so on. You can access these functions by clicking the lightbox tools button.
The user’s current lightbox contents can appear in a bar at the bottom of the pages in which you’ll see files appear as you add them. The lightbox bar can also be minimized if you don’t need it. And there’s of course also a full screen view.
Windowed or Classic lightboxes
You can choose between so called Windowed lightboxes and Classic lightboxes. With the first option, lightboxes are opened full screen in a window on top of the page that you are currently viewing. Closing the dialog takes you back to what you were doing without having to load a page. Many users however prefer “Classic” mode lightboxes that displays lightbox pages as normal HTML pages. You can change the settings via Site configuration, Preview pages in Backoffice. Classic mode also offers a few additional functions that are currently not available in Windowed mode, i.e. message threads and the Copy/Move dialog.
Lightbox collaboration
In XS version 31, the Lightbox collaboration function has been added. This lets website users work together on one or more lightboxes. Please read Lightbox collaboration for further details.
How to enable the “bulk add” buttons
The bulk add buttons allow end users to add multiple files on a page at once to their lightbox or cart. A dialog will appear with all files. By default, all files will be selected. You can deselect (and select) files in the dialog by clicking on the thumbnails before actually executing the action (i.e. adding the files to a lightbox or the cart). The top of the dialog will show the number of files that will be affected by your action.
To enable these buttons on the gallery pages, go to Site configuration, click General settings and open the Gallery pages section. Then check the box “Add to lightbox/cart”. Click Save at the bottom.
To enable these buttons on the search results pages, go to Site configuration, click Search settings and open the General settings section at the top of the page. Then check the box Enable buttons for bulk add to lightbox and bulk add to cart (ie all files on a page). Click Save at the bottom.
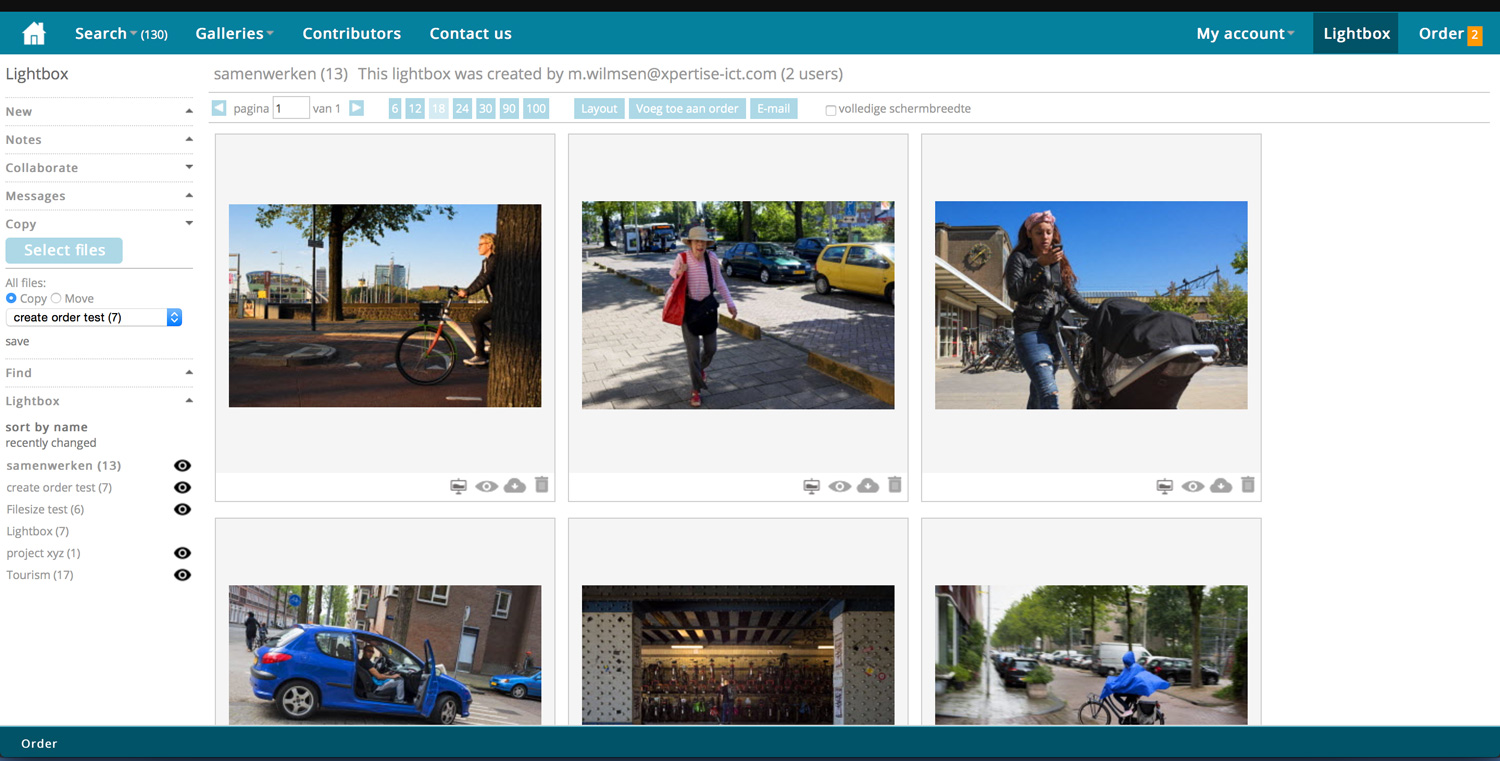
Copy/Move dialog for website users
Staff members have many functions available to manipulate user lightboxes. But your website users also have functions to move and/or copy files between lightboxes. In addition to being able to copy or move the complete contents of lightboxes, version 31 now has the Copy/Move dialog. This lets users select two of their lightboxes and then they can use drag & drop to move and/or copy files between the two. This dialog also saves files in the order in which files are displayed.

Screen shot showing the Copy/Move dialog
Shared lightboxes
In addition to Lightbox collaboration, you can send an e-mail to any recipient with a link to one of your lightboxes. This function is available on the client facing pages, but as an administrator you can also send lightboxes to users from the User management page.
When the recipient clicks the link in the e-mail he or she received, the lightbox will open in the user’s browser. If the recipient has an account and is logged in, files can be added to own lightboxes and/or the cart. Also note that a button “Shared lightbox” will appear as long as the user’s session is still alive. The user can always return to the shared lightbox by clicking this button.
It’s important to understand that Shared lightboxes are dynamic. This means that if you as a sender change your lightbox, the recipient will also see those changes. If you delete a lightbox after sending a link to it, the recipient won’t be able to access that lightbox anymore.
Working with client lightboxes as a staff member
Several functions are available to manipulate user lightboxes if you are logged in with a staff member (admin) account. For further information, read the article Working with client lightboxes.