In addition to managing galleries with the Gallery manager, you can use the Set editor to create, change or remove galleries – while you are using the client facing pages i.e. the normal website.
How to use the Set editor
Log in with an administrator account that has gallery management permissions. After you have enabled the Admin toolbar (you’ll find this option in My account), click the Set editor button to open the dialog when browsing your search results or a gallery based page.

Moving the dialog across your screen
Once you have opened the Set editor dialog, it will remain visible when you browse search results or gallery pages. You can drag the dialog to a different position on your screen by clicking-and-holding the dialog title bar. Its position is saved so that it will appear in the same place when you go to a different page. Note that Set editor will stick to the top of your screen, if the page is longer than your browser’s viewport (visible area).
Hiding the dialog
You can hide the dialog by clicking Hide. The contents of the dialog (e.g. what you have just added to it) will not be removed by hiding the dialog. The contents are stored in your session on the server until your session expires or until you log out. If you want to open the dialog again, simply click Set editor in the toolbar at the top of your screen.
Adding thumbnails to the editor
You can keep adding thumbnails to the editor while you’re browsing search results or gallery pages.
Note: if the Set editor is visible on the page, video thumbnails will not play so that you can also drag video files to the editor.
1) To add a thumbnail, simply drag one to the Set editor dialog. Its background color will turn yellow if you can drop the thumbnail, if it doesn’t change color that means that the thumbnail is already in the editor. The size of the dialog will automatically change depending on the number of files that you have added to it.
2) To add all the thumbnails that are displayed on the page that you are viewing, simply click the Add all on page button that is shown at the bottom of the dialog. Any thumbnails already in there are automatically skipped.
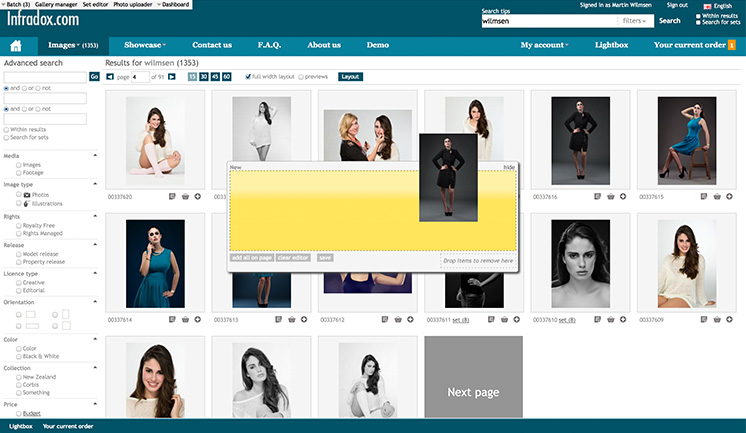
The dialog changes to yellow to indicate that you can drop the thumbnail to add it.
Removing and rearranging thumbnails
To remove a thumbnail, drag it to the small box at the right bottom corner of the dialog (see below). You can click the Clear editor button at the bottom to remove all the thumbnails at once. You can rearrange the order of display that the set will have (after you have saved it) by dragging the thumbnails to a different position inside the Set editor dialog. The first thumbnail will be used as the so called Index thumbnail on overview pages.
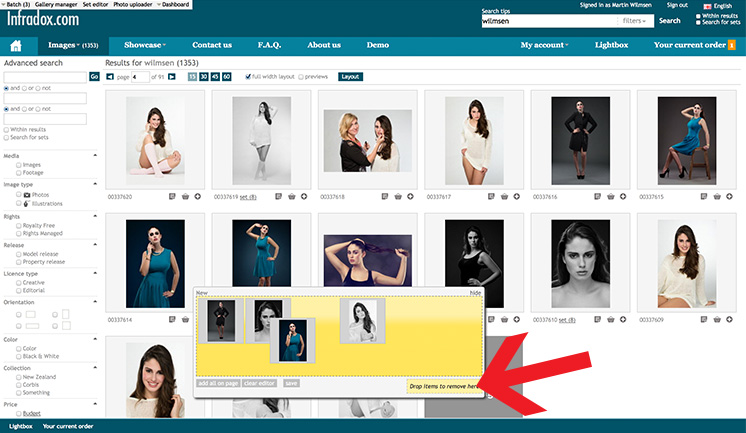
To remove a thumbnail, drag it to the remove box. Rearrange the order of display by dragging the thumbnails to a different position
Saving a set
When you are done collecting thumbnails and after you have rearranged the thumbnails in the display order that you want – click the Save button at the bottom of the dialog. The Set editor will disappear and the Save dialog will appear in the center of the screen. Every set must be saved in a Gallery group. The drop down box in the save dialog (see below) shows the groups that you have previously created. Choose one, enter a title for your set and click Save. Once the set is saved the editor will appear again and you can click Clear editor to remove the thumbnails.
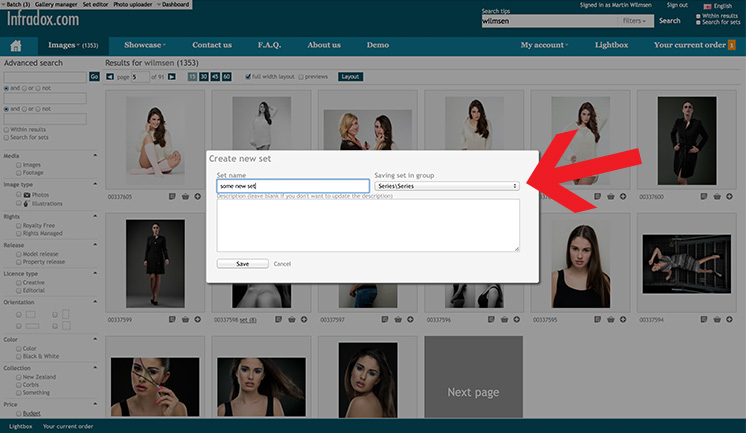
You must select a gallery group when you want to create a new set or when you want to save an existing set
Editing existing sets with the Set editor when on the search pages
If you have enabled Series links, the search results pages will show a link to indicate that the thumbnail is part of a set (a set can be anything e.g. an event, a gallery, a story, a portfolio and so on). Depending on your settings (Site configuration, Search settings, Series links) the first few thumbnails show in a box when you hover over that link or when you click it. If the Set editor dialog is showing, the bottom of the box will show an edit link (see screengrab below). Click the edit link to load all the thumbnails from that set into the editor dialog. The title bar of the Set editor will show the id, the name and the group of the set / gallery that you are editing.
You can remove files, add more files, rearrange thumbnails and so on – and finally click save when you are done.
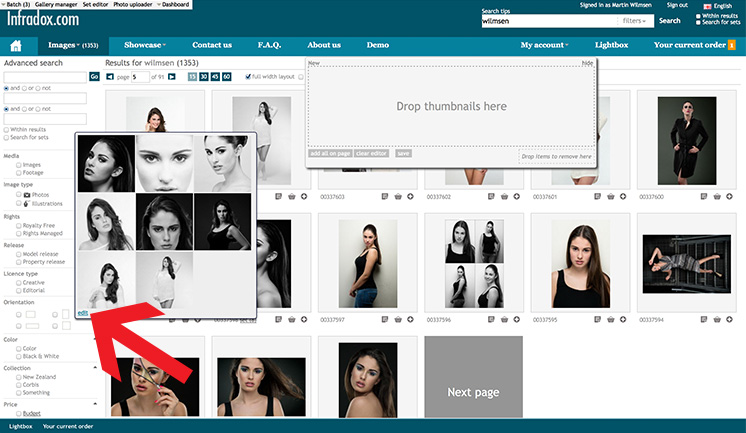
Loading an existing set into the dialog when on the search pages
When you are browsing a gallery page, the Set editor dialog will show the Edit set button in the bar at the bottom of the dialog (see screengrab below). Click the button to add the current set / gallery to the dialog so that you can edit it without having to open the Gallery manager.
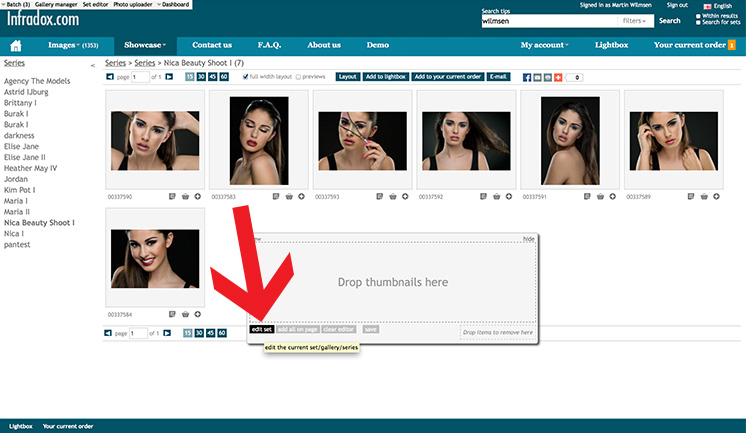
Click Edit set to start editing an existing set when on the gallery pages
Removing a file from an existing set and deleting sets
When you are editing an existing set, you can click the Delete set button to completely remove it. Note that you can not undo this action.
To remove one or more files from an existing set, simply start editing as described above. Drag the thumbnails that you want to remove to the area at the bottom right and when you are done, click the save button.


