
This article explains how you can import invoice details from CSV files (Comma Separated Values). This function is also used to import sales data that you receive from affiliate agencies.
Page last updated on 6 March 2023.
Recommended reading:
For version 32.22 or later
The procedure described below is still available, i.e. you can create a draft invoice for an agent and import CSV sales data on the invoice page. In version 32.22 new functions were added to simplify and automate the process. This is described further down in this article.
With regards to the CSV files, what’s described in the following steps still applies – both for manual or automatic processing of sales files.
For information about viewing the next payment run sales data, read the paragraph about the Next run pipeline.
Step 1. Prepare CSV files for importing
You can create CSV files with any text editor but it’s probably more convenient to use for example MS Excel or other office software (e.g. the free LibreOffice Calc).
- File names may not have spaces. It is recommended to not use characters other than letters, numbers, dashes and underscores.
- For automatic processing sales files and creating sales invoices, start the file names with the user account id followed by an underscore e.g. 10009292_ADOBERFNOVEMBER.
- Create separate CSV files for every agent.
The CSV file can have the following columns and column titles, the column titles are important:
- FILEID
This column must have values that can be used to look up the file in your database. It can have the Infradox 8-digit numbers but it can also have other Id’s that you have stored in e.g. objectname, original file name or one of the custom fields.
Maximum length 50 characters
* Required column - AMOUNTNET
This is the net amount without tax et cetera. If you use multiple currencies, note that the amount is imported as your base currency. You must select a user account that has the same currency as your website’s base currency. You can however convert the imported amounts afterwards.
Must be properly formatted and it must use a dot as a decimal separator. E.g. 50.00. The amount column may not have a currency symbol.
* Required column - DESCRIPTION1
This is the text that will be imported into the invoice detail description. E.g. Textbook interior: print and electronic.
Maximum length 1000 characters
Optional column - DESCRIPTION2
This is the text that will be imported into the second invoice detail description.
Maximum length 1000 characters
Optional column - DATE
Date formatted as text.
Maximum length 25 characters
Optional column - CREDIT
The name of the photographer/supplier
Maximum length 250 characters
Optional column - REGION
This is the sales region as text. E.g. United Kingdom
Maximum length 250 characters
Optional column - CONTRIBUTORID
A value that can be used to look up the contributor/supplier if a detail can’t be matched with a file in the database (32.19 or later)
Maximum length 50 characters
Optional column - ROYALTIESPERC
The royalties percentage if you want to apply such values from the imported file – the data format is 0.00 (32.19 or later)
Make sure that the column titles have no trailing or leading spaces.
If your CSV file already has the columns but the titles of the required columns are different, then simple change the titles (e.g. change Image number to FILEID) before you upload the file.
Your CSV file does not need to have any of the optional columns, and it can have more columns too. However, additional columns (other than the ones listed above) are not imported.
If your CSV file has the columns Description1, Date, Credit, Region (one or more of these) then the values are added together in the invoice detail description field.
If your CSV file has the column Description2, its value will be imported into invoice detail description 2.
If your CSV files contain many details, your invoice will become large and therefore less manageable. You can either manually break up your CSV data into multiple files and then create separate invoices, or you can have the import process create multiple invoices automatically by specifying a threshold in the import dialog. E.g. enter a value of 1000 to automatically create a new invoice after the first 1000 details. The number of invoices that will be created depends of course on the number of details in your sales data file (and the threshold value that you have entered).
Step 2. Create a new invoice
To manually process a sales CSV file, go to Invoice management in Back office. The invoice overview page has a toolbar underneath the selection criteria panels. In this toolbar, type the name of a user account for who you are going to creating an invoice. When you type part of a name, a list with possible matches will appear. Click on the user account in this list to select it. You can now click on the New button – next to the user account name input box – to create a draft invoice.
Step 3. Import your CSV file
In the toolbar at the top of the invoice page, click on Import. A dialog will appear.
Configure the upload settings for your file. You can click “Use Windows defaults” or “Use Mac defaults” to apply the default settings. If you’ve created or saved your file on a PC then use the Windows settings, if you’ve created or saved your file on a Mac then use the Mac settings.
You can either drag your CSV file to the dialog or you can click the Upload a file button to select a file. When the file is uploaded to the server it will be imported into a temporary database table. The dialog will show the number of rows that have been imported.
Step 4. View the imported rows
When you are new to the process, it is recommended to click on “View imported rows” to check that the temporary table has the correct imported values before you continue. After successfully processing a few files (see below), you can change the settings to complete the process of importing data and creating invoice details unattended. To do this, tick the boxes “Disable confirmations/messages” and “Immediately process invoice details after file upload”, and the radio button “Immediately load invoice”.
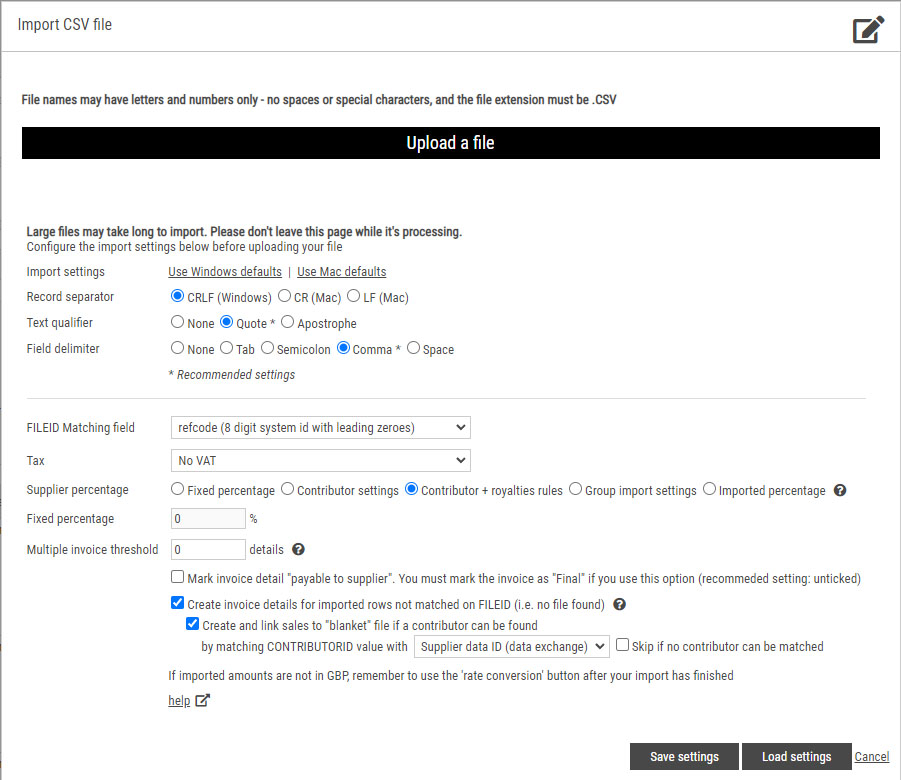
Step 5. Configure the processing settings and process the imported rows
When you’re ready, enter the following settings for your import in the dialog:
- Matching field
Select a field in the dropdown. If your CSV file has 8 digit Infradox id’s without leading zeroes then select ID. If your CSV file has Infradox id’s with leading zeroes, then select the field Refcode. Or select any of the other fields if your not importing Infradox system id’s. - 32.21 or later: if you want to look for imported file id’s in more than one field, then tick the “Multiple fields” checkbox. You can configure two additional fields
- 32.21 or later: tick the box “Check deleted files” – the system will first try to find the file in the live database and if not found it will check for deleted files
- Tax
If you want to add tax to the amounts that you are importing then select the appropriate option in the Tax dropdown. - Select one of the radio buttons for the supplier percentage:
– Fixed percentage, enter a percentage in the input box. This percentage is applied regardless of supplier defaults or group settings.
– Contributor settings, this applies the percentage that is configured for each of the contributors.
– Contributor + royalties rules, this applies the percentage that is configured for each of the contributors unless there’s a matching royalty rule that will override the default.
– Group import settings, this applies the percentage that you have configured as the “import percentage” for each supplier group. Edit the percentages via Supplier management first.
– Imported percentage, this will apply the imported royalties percentage. If less than 1, then the contributor’s default percentage is used. - Multiple invoice threshold
Use this input box to specify the maximum number of invoice details per invoice. The process will automatically created multiple invoices. The recommended setting is 1,000 invoice details. - Create and link sales to “blanket” file if a contributor can be found
If your sales csv files have a column that can be used to look up a supplier/contributor, then you can use this setting to link imported sales to the supplier if a file can’t be found. - Mark as payable to supplier
Check this box to immediately mark the invoice details as payable to the supplier(s). It is recommended to leave this box unticked. - Import rows for which a file can’t be found
If the file can’t be found in the content database, you can still import the row – but it will be imported as a normal invoice detail, i.e. not linked to a file and supplier/photographer. You can link such invoice details to suppliers manually after the import has completed. In version 32.19 or later, your CSV file can have a column CONTRIBUTORID that can be used to automatically link invoice details to the suppliers if such details can’t be linked to a file. I.e. if there are sales records for files that are not in your database.
When you are done, click on the Process imported rows button.
The server will process the rows in the temporary table, and when it’s done it will display the results in the dialog (unless you have enabled “Immediately process invoice details after file upload”. Click Ok to close the dialog and to reload the invoice page with all the imported details added.
If processing failed, check your settings to make sure the correct “Matching field” is selected, and click Retry to try again.
Click on the Save settings button at the bottom of the dialog to save the current import and processing settings. The next time you use the dialog the saved settings will be automatically applied.
Step 6. Assign unmatched sales/invoice details to files and/or suppliers
Before 32.22
If there are invoice details for which a file could not be found in your database, you can attach those details to suppliers (contributors) manually. The right most column of the invoice details list will show links “Attach to supplier”. To attach a single invoice detail to a supplier, click on the link to open the dialog. If you want to attach multiple invoice details to the same supplier, then first select the details with the checkboxes and then click on any of the “Attach to supplier” links.
32.22 or later
Use the radio buttons at the top of the invoice details to filter the view and to check for sales records that need your attention. To manuallay attach a sale (invoice detail) to a file, click on the “Look up file” link. If a file doesn’t exist in the database, then you can link the sales records to suppliers by selecting the details with the tick boxes on the left. Then hover over the Action button above the details and then click Assign supplier.
Step 7. Applying corrections
You can edit each invoice detail if you need to make corrections to imported amounts, royalties percentages et cetera. In 32.22 it is also possible to change the imported/assigned royalty percentage for multiple details by selecting the invoice details with the boxes on the left – then click Update royalties in the Action menu.
Step 8. Currency conversions
Amounts in your import file are imported as amounts in your own currency (i.e. the website’s currency). If you have imported amounts in a different currency then your website currency, you can now use the Rate conversion function that you will find in the Action dropdown (in the toolbar at the top of the page). This function allows you to enter a conversion rate and to apply that to all the invoice details. The invoice will load again after the conversion has been executed on the server.
Step 9. Making changes and finalising the invoice
You can make further changes to the invoice (e.g. delete some of the imported rows, change prices, royalties percentages et cetera) as long as the invoice is not saved as final. You can also add more details, import another CSV file and so on. When you are done, check the box “Final” and click on Save or Save and Close.
Step 10. Marking invoices as payable to the suppliers and making payment corrections
To be able to either mark the invoice details as payable to the suppliers or to make payment corrections, the invoice must be saved as final first. If you are processing multiple sales files, it is recommended to process all sales files before making invoices final. When you are done, go to the invoice overview page and click on “Check draft royalties. This will open a dialog showing you all the invoice details of draft invoices that may require your attention. For example because the royalties are 0%, there are sales not linked to suppliers et cetera. This dialog has function to correct any problems and you can download a CSV file of all or selected “problem” sales.
If everything is ok, then select the invoices in the overview of the “Invoice management” page, and click on Mark as final, paid in full and payable in the Action menu.
If invoices are marked as final and you need to apply a payment correction – e.g. to compensate for currency differences – then open the invoice and scroll to the bottom to apply a payment correction (you can also click Payment correction in the Action menu at the top).
To undo a correction, use the Payment correction function again. Select the Amount radio button and enter 0.00 in the
input box.
Problems with importing
- If you want to start over again, click the button Delete details in the toolbar and repeat the process.
- If the import of the CSV file returns errors, then check your CSV file to make sure that it has the required columns, that the columns have valid characters only and that the column names have no leading or trailing spaces.
Checking which sales will be part of the next payment run
To view the “Next run pipeline” (i.e. which supplier sales will be part of the next payment run), go to Supplier sales data and click on Next run pipeline in the toolbar.
The dialog will show all sales eligible for payment to the supplier taking the settings re the payment threshold (i.e. sales must be higher than x amount) and periodicity (last payment must be longer than x days ago) into account. The overview will of course only show sales that are marked as Payable to the supplier. Click on Download CSV in the toolar to download a file that you can open in e.g. Excel.
Automatic processing of imported sales files
The below functions are available in version 32.22 or later.
Step 1. Prepare your CSV files
If needed, edit your CSV files as explained in this article (to make sure the required columns and column headers are used). Although not required, it is recommended to start the file names with the user account id’s so that invoices can be created automatically.
Step 2. Upload the CSV files
Open the File manager and navigate to the Sales data\import folder in the tree on the left. Then click Upload in the toolbar and drag the CSV files onto the File manager upload area. When all files are uploaded click Finish uploads.
Step 3. Process the files
First you will need to lock invoicing. Go to Invoice management and click on Lock invoicing on the right at the top. While invoicing is locked, others can’t create or edit invoices to make sure that processing can be done without interruption.
Go to Supplier sales data and click on Sales files in the toolbar. In the dialog click on Scan folder. The list will show all the files that you uploaded in the previous step. If files are missing, then open file manager and make sure that the file names are correct. You can rename files if you made mistakes. Then click Scan folder again.
Optional: check files first
If you want to check the files first, before attempting to automatically create invoices – then select all the files with the boxes on the left. You can click the box in the header to select/deselect all files. Then click on Check files in the toolbar. This will import every selected file into a temporary table and it will then look up each imported sales detail to check if the file exists. Remember to configure the settings before you do this (Settings button in the toolbar). This process may take long (even several minutes) if the CSV files contain many details. To stop the process, click on Cancel processing in the toolbar. This will stop the process after the current file is done.
Wait for the process to complete, the new status of each file will not show until all files are done.
The list will show the status of each file on the left. The Invoice account column shows the account id for which an invoice can be automatically created (note the file naming convention described above). If there are unmatched files, the tools column will show a download link. This lets you download a CSV file with file id’s that are not found in the database. Or click Unmatched CSV in the toolbar to download a single CSV file that lists all the file names and missing id’s.
If a file is ok (i.e. all files were found) then the tools column will show a link that lets you create an invoice for that file.
Automatic processing
To automatically check and generate invoices for each of the selected files, click on the Automatic button in the toolbar. Automatic processing does not require you to check files first. The process will check all files and if ok, then an invoice is automatically created. If there are files that have missing id’s/unmatched files, then an invoice will not be created for those files, and you can either create invoices manually or you can fix any problems first and then run the Automatic process again.


