The Infradox menu builder lets you create your menus and it lets you rearrange the order in which items appear – with drag & drop. The menu builder has standard menu items, and it lets you add your own items and submenus too.
Recommended reading
- Website constants
- Using the code editor
- Gallery management
- Building search categories with the gallery manager
- Custom header and menu
Introduction
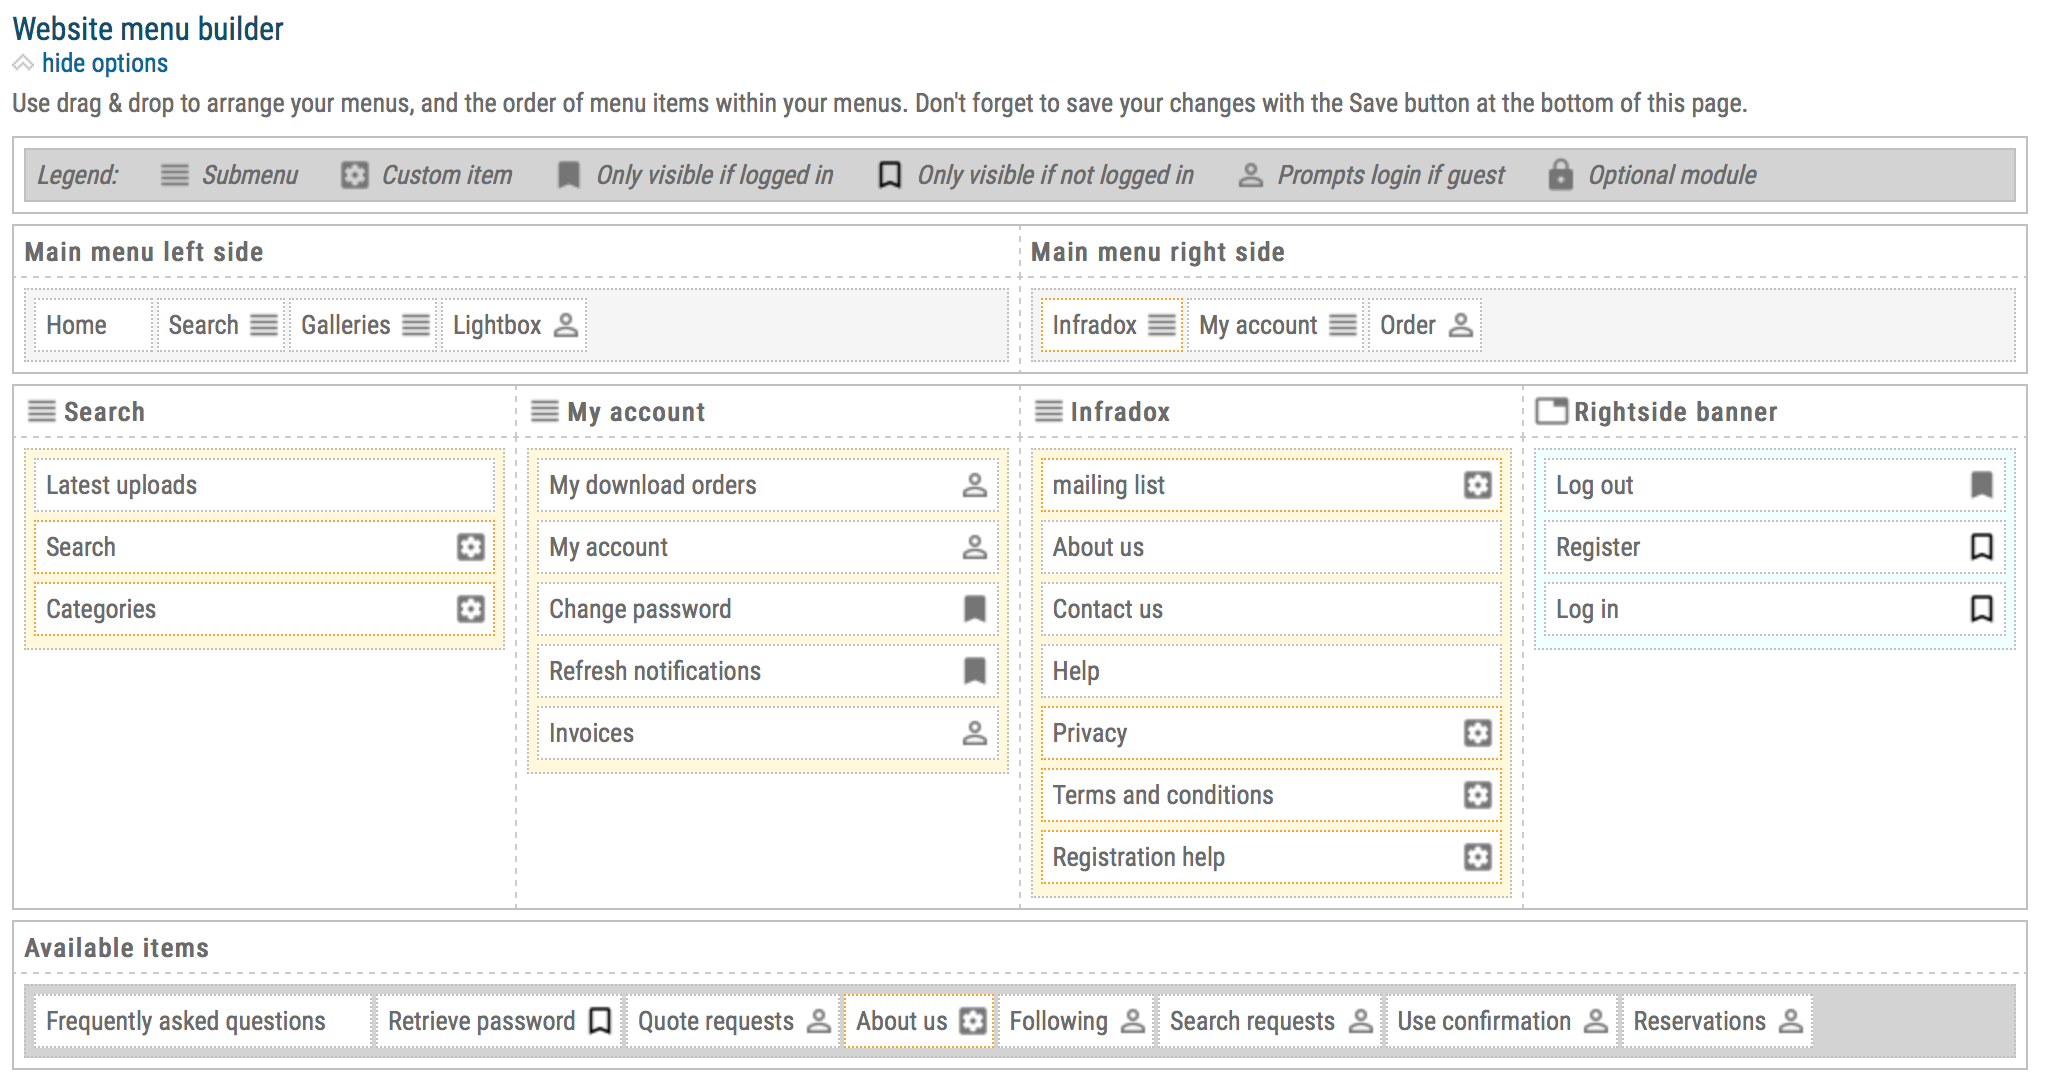
The default website layout has a main menu bar consisting of a left and right part. Furthermore, there are submenus for Search, Galleries and My Account, and there’s a custom submenu (see above screen shot). You can configure your menus with drag & drop and you can also change the default labels that are used. It it recommended to use the Menu builder always, even if you use the Code editor to create a custom banner and menus. The menu builder will automatically generate and cache the HTML for your menus, taking user permissions and the active locale (user interface language) into account.
Adding items to your menus
Go to Site configuration and click on Menu and Pages in the side bar, then open the Website menu builder section.
The builder consists of 7 different sections. You’ll see the left- and right side of your main menu at the top, 4 sections for your submenus and banner underneath, and a section with available items (currently not in any menu) at the bottom.
You can use drag & drop to add or remove items to and from your menus. And you can also use drag & drop to rearrange the order in which menu items appear. Note that localisation is supported but the menu builder will show the primary language only.
You don’t have to use both the left- and right side in the main menu. If for example you want everything in the left part only, then simply remove any items from the right side. The client facing pages will only show menus that have any content. It’s of course also possible to exclude items from the menus and to make those items available elsewhere, e.g. in your page footer.
Custom menu items
You can also add custom menu items. Before custom items will appear in the Website menu builder, you’ll have to create the items in the section Website menu options. Each custom item needs a label and a link (URL). If your website is configured to work with multiple languages, then enter your labels separated by comma’s – for example Pricing, Prijzen if you use English and Dutch. When you have added your custom items, open the Website menu builder section again and you’ll seen your new menu items. You can now add these items to the menus.
Changing labels for the standard menu items
To change the labels that are used for the standard menu items, go to the Constants editor by clicking Constants in the side bar (remember to save your menu first). If you hover over an item in the menu builder, you’ll see the name of the constant that is used. For example pag_aboutustitle. You can find these constants in the file constants-defaults.txt.
The Search menu item
The Search menu item takes you to the page with your last search results, or the search results page without any thumbnails if you haven’t searched yet. This page can be configured to display search filters, advanced search boxes and so on via Website configuration, Search settings, sections Advanced search panel, Search filters, Custom filters and Tag lists.
The Search menu item, can also function as a submenu. Simply drag menu items to the Search section in the Website menu builder. Note that the Search item can only function as a submenu item if it is part of either the left- or right side of the main menu. To add an item to take you back to the search results to the submenu, you can create a custom menu item with the link /search.
If you want to display the number of found files in the Search menu item, then go to Search settings in Site configuration and open the section General settings. Enable the setting Show the number of found files in the /search menu item, and scroll down to Save your settings.
The Galleries menu item
The Galleries menu item can be added to the left or right side of the main menu. It acts as submenu that will be populated with galleries that you select in the Gallery manager. The menu item itself does not link to a page by default. To change this, open the Website menu options section and enter a link in the box Gallery menu URL. For example /favorites.html.
The Home menu item
You can add the Home menu item to your menus. By default it will then display as a normal menu item with a label. If you want to use an icon instead, then open the Website menu options section and select one of the options (radio buttons) for the parameter Home menu item. You can use the standard white home icon, but you can also upload a different icon of your choice. Note that you don’t have to add the Home item to your menu, clicking the logo in the page banner will also take you to the home page.
Website notifications
Infradox websites use a notification system to inform your clients of changes, messages, invoices past the due date, reservations about to expire and so on. To enable this function, the menu item Refresh notifications must be part of any of your menus. By default, the number of unread notifications is displayed immediately after the My Account submenu. If this menu item is not in the (left- or rightside) of your main menu, then you’ll have to manually add a place holder element to your HTML. Contact support for further information about this.
Items in the page banner
The section Right side banner in the Website menu builder is where you add menu items that you don’t want to appear in the menus, but above the right side menu in the banner. Usually this is reserved for the items Log in and Register. When a user is logged in, his/her user name usually appears in this section as well. You can not add other items to this section with the menu builder. You can of course create a custom page header which will let you add any item anywhere.
Duplicate menu items
If you want a menu item to appear in more than one menu – e.g. if you want the Search menu item to function as a submenu item in the main menu, but you also want this item inside a submenu with a different label – then simply create a custom menu item for it. It will then appear in the Available items box of the Website menu builder and you’ll be able to drag the new item to any of your menus.
Using the menus in custom templates
If you want to use a custom made template for your page header – containing your menus – then you can use the XS tags to insert your menus.
To insert the left side part of the main menu:
To insert the right side part of the main menu:
To add the HTML for your dropdown menus:
Please read the article Custom header and menu for further information.