Online payments with PayPal are part of every version of Infradox XS. This article describes how you can create and configure a PayPal account for use in your website.
Websites on Infradox version 32.19 or later can also use Stripe for online payments. For more information, have a look here.
General information
You can configure the download process so that users can pay and download files without requiring any staff member intervention. For RF files you will have to set up the file sizes and the prices for each of the sizes first. If you have RM files, then you will have to set up the Price calculator first (see recommended reading below for more information).
You can specify for each user account whether or not you want the user to pay online (on the permissions tabsheet in the user properties dialog). This way you can e.g. let your regular customers order files without having to pay before downloading, while other clients are required to pay online to be able to download files. You can configure the default settings and permissions for new user accounts in Back office (Site configuration > New user defaults).
It is also possible to allow users to create orders without requiring them to pay, even if you have configured your website for online payments. Staff members can then quote a price for a new order, and they can then configure the order to require online payment to enable download permissions.
Recommended reading: Price calculator for RM images, File collections and download sizes, Displaying file details and prices.
Setting up your PayPal accounts
Please follow the steps described below to create a PayPal account for your XS website.
Step 1 – Create a PayPal Sandbox account
Go to PayPal Developer and sign up for a PayPal Sandbox account if you don’t already have this and then sign in.
Go to your Dashboard and select the Accounts link in the sidebar on the left.
Step 2 – Create a Buyer Account
Create a Personal (Buyer Account) and set the PayPal Balance to a large amount so you can do test purchases. Choose an e-mail address that makes it easy to tell that it’s the buyer’s account.
Set Bank Verified Account to Yes and select a credit card:
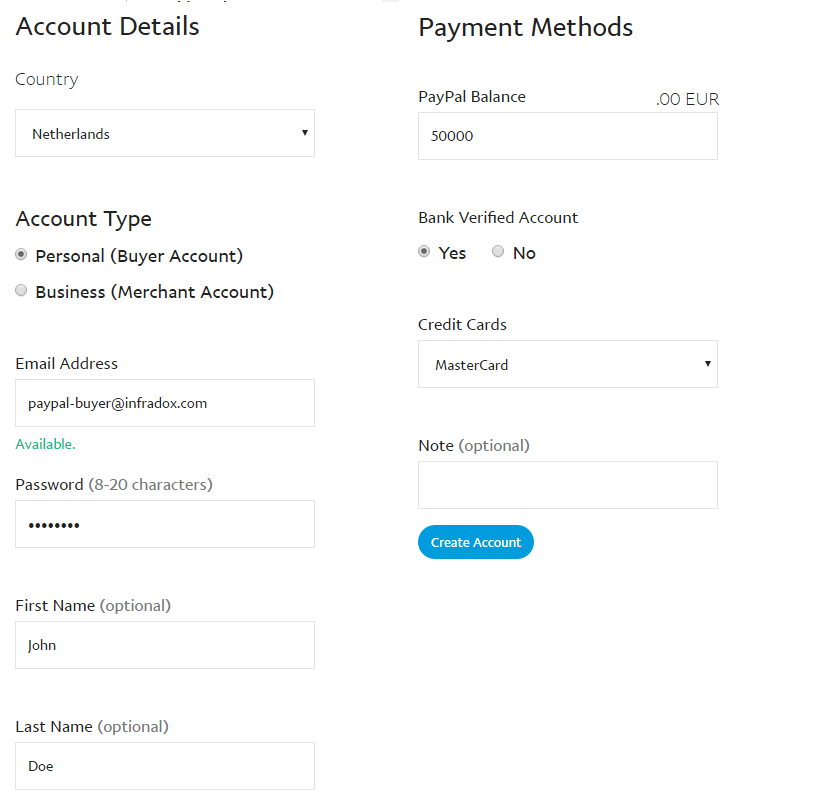
Please note that the e-mail address paypal-buyer@infradox.com is just an example, you have to use one of your own e-mail addresses, preferably one that you’ve created specially for PayPal testing. The same applies to the e-mail address used for the Seller Account in Step 3.
You’ll see the following message if the account was successfully created:

Step 3 – Create a Seller Account
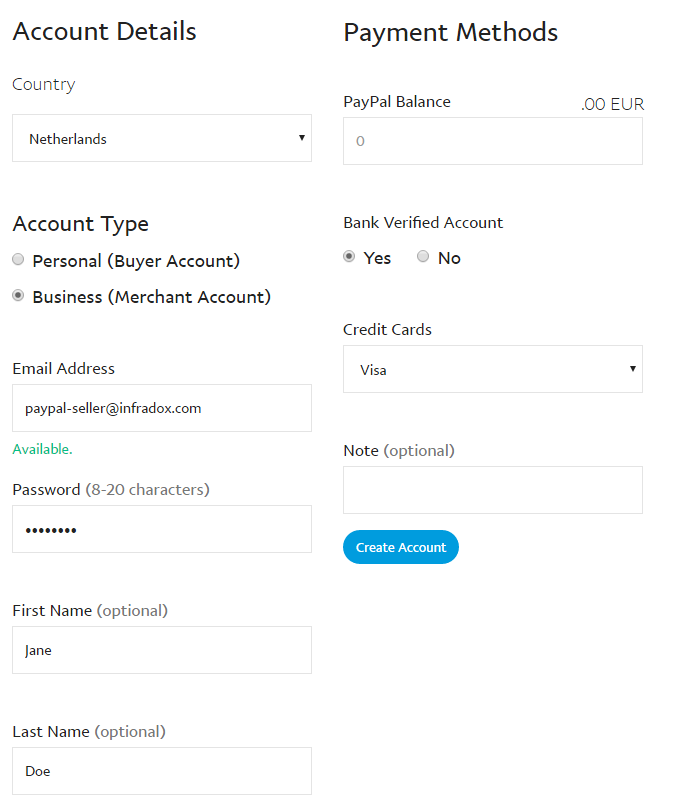
Click the Create Account button again and now choose Account Type Business (Merchant Account). Choose an e-mail address that makes it easy to tell that this is the seller’s account.
Step 4 – Create a Pay Button
Open a new browser windows and log in to your PayPal Business Account.
If your account is a personal account, you’ll need to upgrade it to a business account first
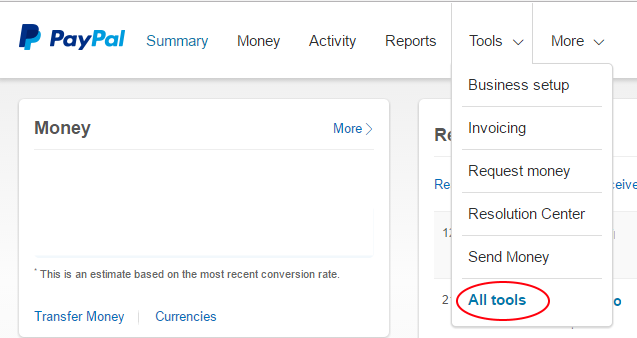
In the top menu, select Tools -> All Tools:
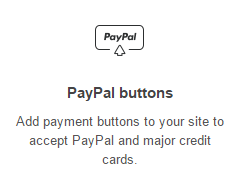
Select the PayPal buttons tool:
Next you’ll see an overview of your Saved Buttons:

To create a PayPal Button to use on your website, click the “Create new button” link.
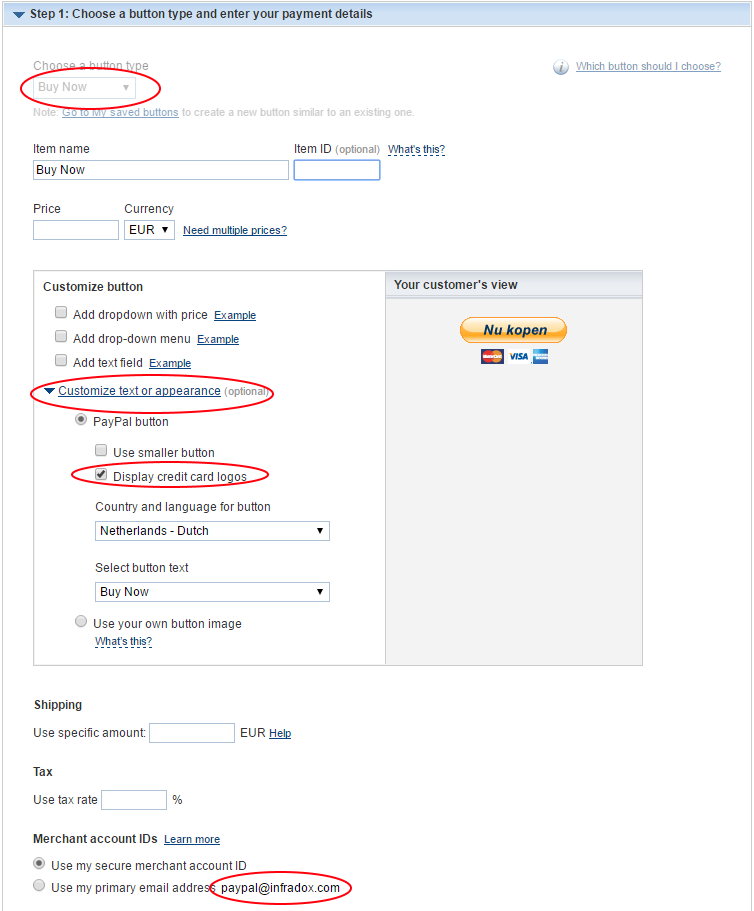
Select button type “Buy Now” and then click “Customize text or appearance”.
Make sure to select “Display credit card logos”. Leave all the other options unchanged – ie don’t enter any information in the other boxes. Scroll a bit down and copy the e-mail address that is shown under Merchant Account Id’s
Copy the e-mail address and then paste it in the “Paypal Business ID” input box of the PayPal configuration screen of your Infradox website.
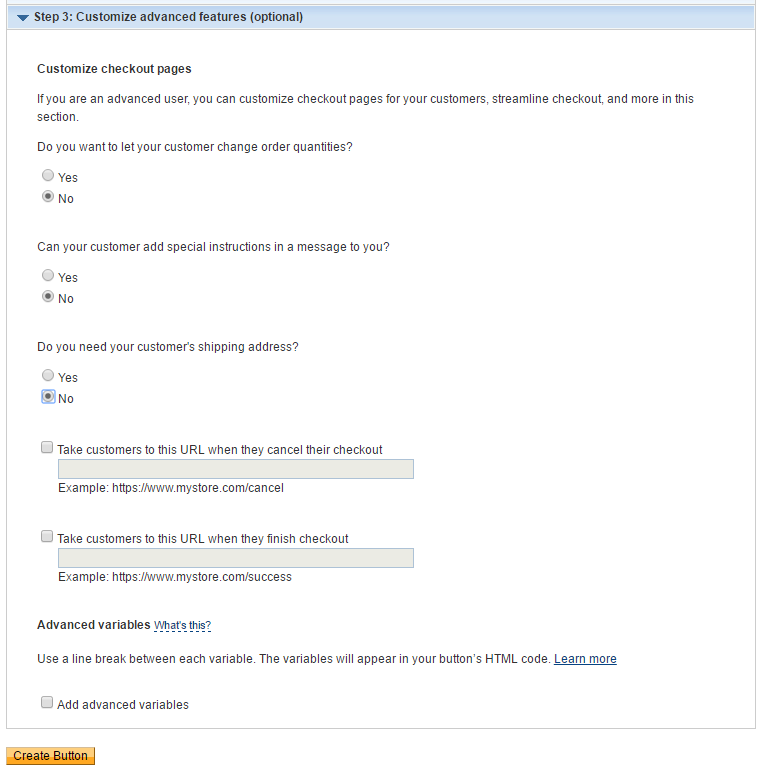
Note that you must use this and not just any other e-mail address. On the PayPal site open step 3 “Customize advanced features” and change the settings as show in the following screen shot.
Finally, click the “Create button” at the bottom of the page.
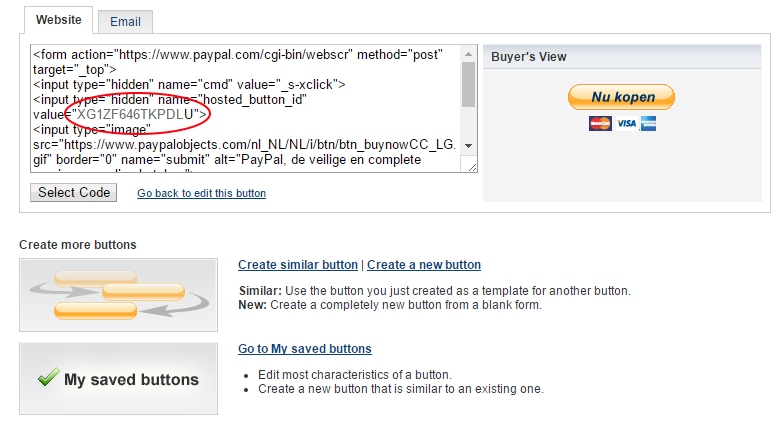
The code for the hosted button will show (you can also access this later from My Account, Profile, My Saved buttons).
Step 5 – Configuring the PayPal page in your website
Log in to your website and go to the PayPal configuration page (Administrator menu ->Site configuration ->PayPal)
Copy the exact value for the hosted_button_id (see screen shot) and paste it into the “Hosted Button ID” field in the Infradox PayPal configuration screen in your website:
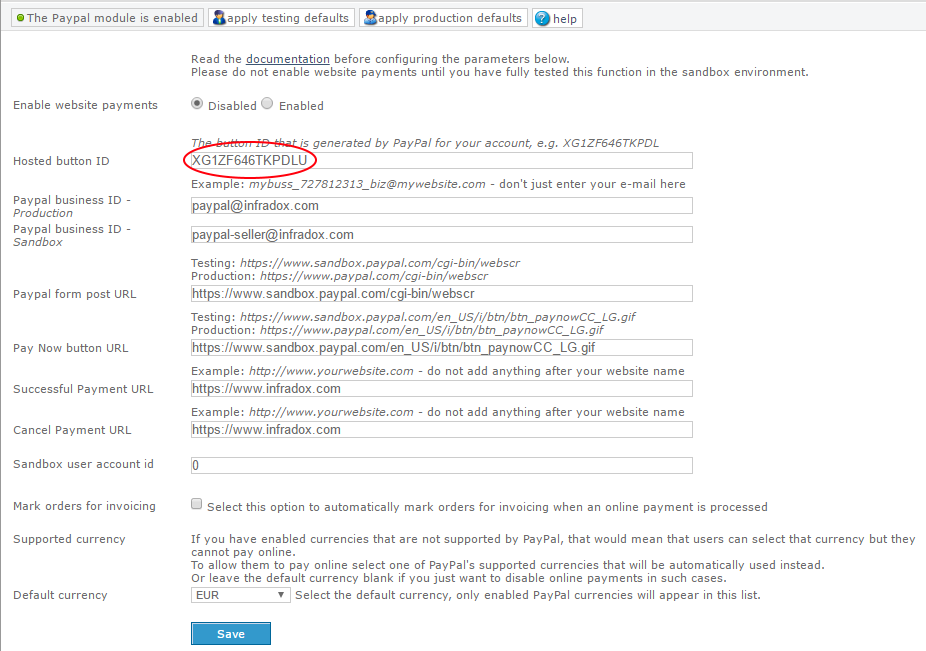
Now save the Infradox PayPal configuration settings.
Step 6 – Setting up Instant Payment Notifications
Log in to your PayPal Business Account and go to Profile and settings:

In you profile settings, choose “My selling tools”:
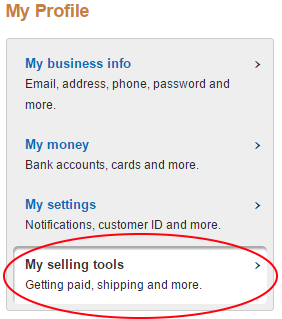
Click on the “Update” link next to “Instant payment notification”:

If this is the first time configuration, you’ll see the following screen:
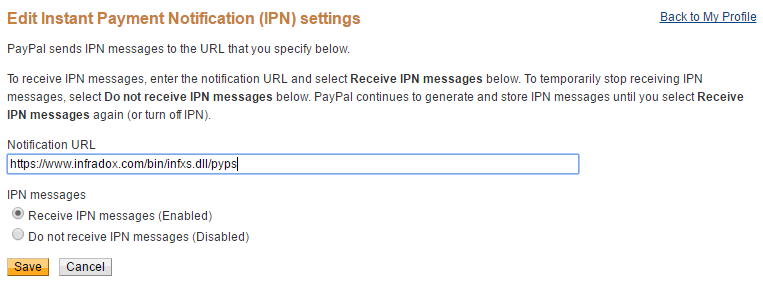
Continue by clicking the “Choose IPN Settings” button and enter the Notification URL for your website.
For example:
http://www.mywebsite.com/bin/infradox.dll/pyps
- Replace www.mywebsite.com with the domain name of your website (must start with http://)
- Replace infradox.dll with the name of your website dll.
So if your website domain is www.peoplepictures.com and your dll name is ppic.dll, then the Notification URL will be http://www.peoplepictures.com/bin/ppic.dll/pyps
Click the Radio button “Receive IPN messages (Enabled)”

Step 7 – Setting up PayPal payment preferences
From the “My selling tools” section in your PayPal profile, set your website preferences by clicking on the “Update” link next to “Website preferences”.
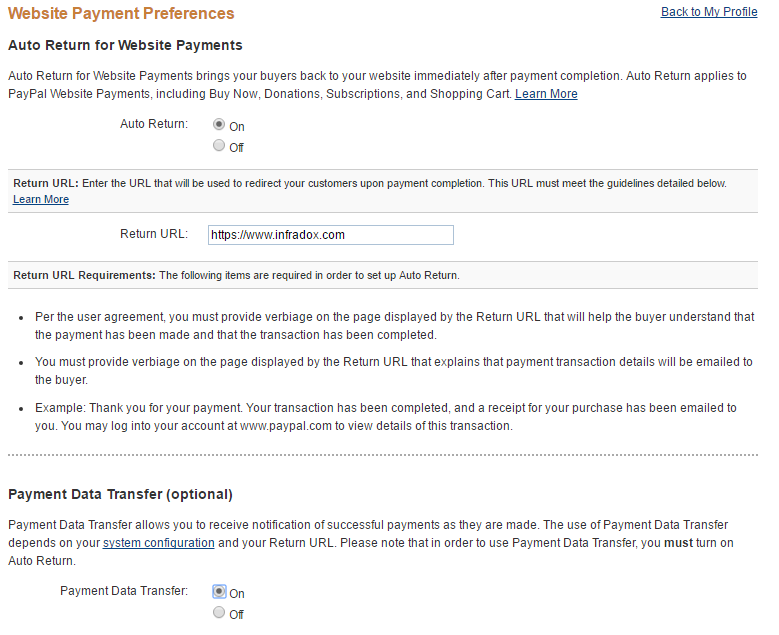
On the Website Payment Preferences page (see screen shot below):
- set Auto Return to ON and
- enter your website address (e.g. https://www.infradox.com) in the Return URL box
- set Payment Data Transfer to ON and save the changes.
Step 8 – Test payments
Login to your (test) website with an account that is required to pay online to enable download permissions. Complete the steps of the order process for either a rights manged or a royalty free photo. The confirmed order page will show and the “Pay Now” button appears at the bottom of the page.
Click the Pay Now button and log in with the buyer’s test account that you have previously created. Follow the PayPal instructions and after the payment has been completed the order page will be displayed again with the permissions enabled.
If you are not automatically returned to the order page then make sure that you have properly configured “Website Payment Preferences” as described in this 7/8 document. It may also mean that the payment is pending because the user paid in a currency for which your PayPal account was not (yet) configured.
If that’s the case then go to the PayPal site to view if there are pending payments. The order permissions will be automatically enabled after you have accepted the payment on the PayPal site. The order status will also be automatically updated if you choose to deny the user’s payment.
On your website, go to Admin, Orders to view the test order that you created. It should list as “Online payment completed (8) (ready for download”. Click the order to open the details page. At the top of the page there’s a link “View PayPal IPN details”. Click that link to view the transactions that took place between the PayPal server and your website with regards to this order.


