
XS includes a built-in price calculator for RM images. You can define the parameters that will determine the price for an image depending on its use. It is possible to require only certain or all users to calculate a price when they order such files on the website.
Important
Infradox Flex websites require both script to be added to the code editor, and changes to be made to existing scripts. This approach offers extensive possibilities for custom implementations and it reduces the library foot print for websites that don’t use the price calculator. Scroll down to learn how to implement the price calculator.
You can configure and/or change the calculator without affecting the client facing pages. Once you are done, and after you have tested your settings, you can publish your changes to make a new version of the calculator “live”.
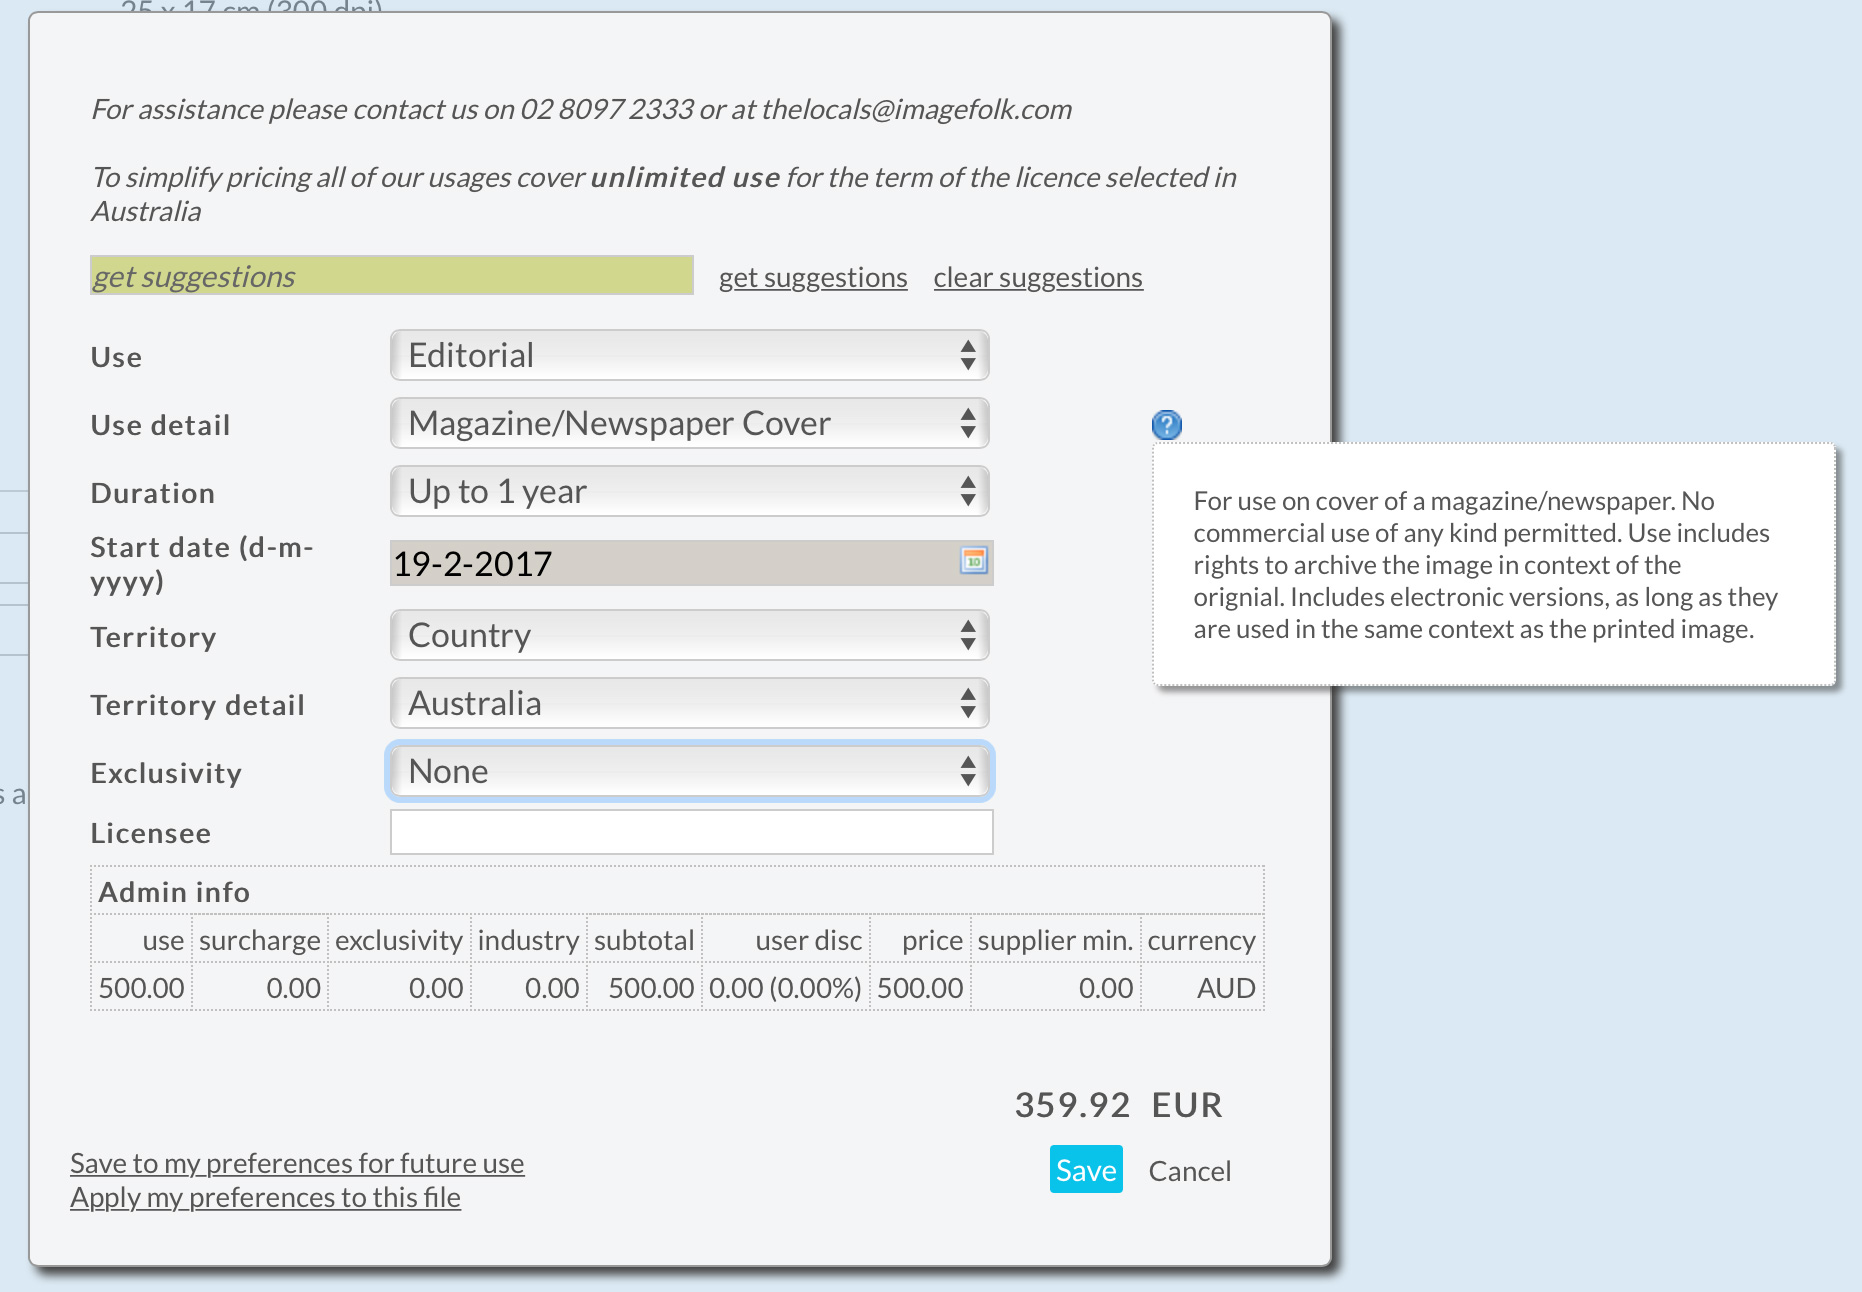
The above screen shot shows an example of the price calculator when logged in as a staff member. The bottom of the calculator (admin info) shows how the price is put together. It also shows that you can add hints that will appear to explain a usage option.
If a user is required to use the price calculator (this setting can be applied to each user account via User management), then the input form that you have configured for RM images will not appear in the cart page. A “Price” button will show instead. Logged in users can save their preferences in the calculator, so that they can easily apply the same use as a starting point when they order more files later. The client facing version of the price calculator will show you how a price is calculated if you are logged in with an admin account. The price calculator takes user discount percentages and supplier minimum prices into account.
Using the price calculator instead of the quote form
A quote button can be displayed on preview pages for any file type, for guests and logged in users and so on. This button will display a dialog that the end user can complete. The results are then both stored in the database (accessible via Back office, Quote requests) and sent by e-mail to an address of your choice (more info the article Configuring e-mail and e-mail templates). You can however configure the “quote” button to link to the calculator as opposed to displaying the Quote form. This way even users that are not logged in can calculate a price for a RM photo.
If the price calculator is used in “Quote mode”, two fields are added at the bottom of the dialog. One where the user must input his/her e-mail address and one field for the user’s name. If the user is logged in, these fields are entered automatically. You can change the labels as described below.
It is possible to link the quote button to the price calculator but without showing prices, in which case you can use the dialog to guide the user to the available options and parameters that you use to determine a price (e.g. the circulation, duration, territory, print size and so on). But without actually displaying the calculated price. The price will however show in the e-mail sent to you – and it will also appear in the internal notes of the request.
Configuring the calculator Step 1
Click “Price calculator” in the administrator’s dashboard. In the bar on the left click Configuration to select the basic settings.
- Sizes
- Print runs
- Inserts
- Placements
- Durations
- Territories
- Industries
- Exclusivity
The above parameters in the section “Calculator parameters” show three radio buttons for each of the items that you can configure to calculate a price. If for example “Size” doesn’t affect the price, then select the “not used” radio button. This means that the price calculator will not ask the user to select a “Size”. The same is true for all other items (Print runs, Inserts, Placement, Duration, Territory and Industry).
For each of the items that you do want to use, select either “add to base” or “running subtotal”. Either of these will make the item appear in the price calculator but the way the final price is calculated is different.
If you select “add to base”, that means that the starting price for the selected use (e.g. Advertising, Advertorial) is changed by either adding a percentage or fixed amount for each of the selected parameters. E.g. the starting price for Advertising, Advertorial is 200 Euro. The user selects 1/2 page for the Size parameter and that adds the configured amount to the starting price. The fixed amount to add can be zero or a negative amount. And it can be calculated as a percentage of the starting price.
If you select “running subtotal”, then the final price is calculated by adding amounts to the running subtotal. For example if the starting price for the selected use is 200 Euro, and there’s a surcharge of 10% for the selected size then the running subtotal is 220 Euro. If the next parameter is Print run and the selected parameter again adds 10%, then the new running subtotal is 242 Euro (+10% of 220 Euro) and so on. You can select the order in which you want to calculate the running subtotal by dragging the items around.
It is possible to use a combination of both calculation methods. For example “add to base” for Size, Print run and Inserts. And “running subtotal” for all other parameters.
About the items Use, Territories and Industries
The items Use, Territories and Industries are parent/child items. I.e. the first drop down acts as a group, and when the group is selected the child drop down box is populated with data. For example, select the Territory group “Regions” and then you can choose one of the items in the linked child box Territory detail (which may have for example Asia, Benelux, Europe and so on). You can’t change this behavior with the settings provided, but you can manipulate things with script (described in detail at the bottom of this article). E.g. if you have only one entry in the Industry group and you want only Industry detail to be displayed in the calculator, then that can be achieved by writing your own xspricecalculator.onready function in the code editor.
Settings
- Hide N/A option boxes. Select this to hide any drop down boxes that have no values. For instance, you may have configured Print runs to be used in the calculator but this may not be relevant to certain uses and as such you will not have linked any of the Print runs options linked to that use (this is explained in step 4 below). The drop down box for Print runs will then automatically be hidden.
- Payments/permissions. You can disable automatic permissions and online payments if the resulting price is 0. This may happen if you haven’t completely configured certain uses. This option should be selected/checked.
- Exclusivity. If you want to allow users to select exclusive use, you may want to disable price calculation so that you can negotiate prices depending on the required exclusivity. Disable this option if you don’t want to offer exclusive uses. If you do enable this option, then select the types of exclusive uses that you offer and how such exclusivity affects the price.
- You can add up to 5 fields that will appear in the price calculator. Use this if for instance you want the user to specify the publication title. For each of these fields you can specify if it’s a required field or not.
- Suggestions You can enable a suggestions function to help the user find the use settings (also see below).
- Instructions You can enter your own instructions that will show at the top of the dialog if the calculator is in “normal” mode. If you don’t enter anything here, then the default text will display – unless you have also disabled the suggestions setting. In that case, the top of the dialog will show no text. Note that if you enter your own instructions and you have enabled suggestions, then the default explanation about the suggestions function will not display. You can use HTML in the instructions, e.g. to add a link to a help page or a mailto link.I
- Quote mode instructions You can enter a text that you want to display when the calculator is in “Quote” mode.
- Sent confirmation Enter a text that will be displayed when the user has successfully submitted a quotation.
- Discounts If you want discounts (amounts) to display separately in the calculator dialog, then select the appropriate options. If enabled, a subtotal is displayed, then the discount amount and then the final amount.
- Labels for E-mail and Name If the dialog is displayed in “Quote” mode, two fields are added to the bottom of the dialog. One for the user’s e-mail and one for his/her name. You can change the labels that you want to use for these fields. The defaults are “Your e-mail address” and “Your name”.
Select the options that you want to use and click Save at the bottom.
Suggestions
The calculator has a “suggestions” function. You can type (partial) words to get suggestions. To get suggestions for both use and territories you can use commas to separate the input. E.g. if you type “adver,australia“, suggestions may show Newspaper Advertorial and Australia. Clicking these suggestions will automatically select the correct values in the calculator’s dropdown boxes.
Step 2 – Use details and base prices
Click Use details + base prices in the bar on the left. You can now create groups and details within these groups. As an example, you can create a group Editorial and within this group you can add the follow 4 details: Newspapers, Magazines Print only, Magazines Digital only, and Books.
The use details will determine the so called Base price. This price is the starting point for any selected use and any additional fees are added to it. If the group Editorial has a base price of 100 Euro and its detail Newspapers has a base price of 50 Euro – that means that the base price for Newspaper use is 150 Euro.
You can add a help text to each use group and each use group detail. If there’s help text, the price calculator (on the client facing pages and in the test calculator) will show help icons next to the selected options. When you hover over these icons, a help balloon will appear. The client facing version of the calculator uses divs with a help icon as a background image, so that you can replace the icon with your own image, or so you can change its appearance otherwise, if you want to. The class name of the icon container is #pricecalculator .iconhelptext.

The above screenshot shows one of the configuration screens
Step 3 – Create the parameters that will affect the base price
If you want the print size to affect the price then create the sizes that you want to use (click sizes in the bar on the left). Any size can be added. The system uses groups to organise sizes that belong together. For instance A0, A1, A2, A3 etc. in one group, and Full area, Half area, Quarter area etc in another group and so on. Later on you’ll be linking the applicable sizes that you have created to the different uses that you have created in step 2.
Do the same for the other parameters, i.e. print runs (circulation), inserts (e.g. 1, less than 10, less than 20), placement (e.g. inside, cover), duration et cetera.
Note that if you have specified a minimum price for a supplier (via Supplier management), then the calculated price will be automatically adjusted if it is lower than the minimum price. If this happens and the end user has a discount percentage, then the minimum price will be raised with the discount so that the minimum price can never be lower than what is specified – regardless of a user’s discount %.
Step 4 – link the parameters to uses and surcharges
You can configure one use, and then you can copy the settings to all other use details within the same group. If you do this, the settings for all use details in that group will be removed and the settings of the base use will be applied. Therefore it’s important that you don’t start with this step until you are done with the previously described steps.
Click RM images pricing in the bar on the left. At the top of the page, select a Use group. The drop down box next to it will then have the Use details that you have created for this group (in Step 2). Select a Use detail and the page will show a dialog that you use to configure all parameters for the selected use.
The dialog has tabsheets for each of the parameters that you have selected in step 1. Each of the tabsheets shows two boxes. The one on the left has the options that you have linked to the selected use. The box on the right shows all remaining (unlinked) options. Drag a single item or an entire group from the right into the box on the left to link those items. Then, you can either enter an amount or a percentage. This amount or percentage is added to the base price (as described in step 2). Using our earlier example, let’s say that you have linked the sizes Full page, 1/2 page, 1/4 page and 1/8 page to Editorial > Newspapers. And you have entered 100% for Full page, 50% for 1/2 page, 25% for 1/4 page and nothing for 1/8 page. If the user selects this use and then selects 1/2 page, the calculated price will be 150 Euro + 50% of 150 Euro, so 225 Euro.
About territories
All territories that you have defined will always appear in the price calculator. You don’t have to link territories to the uses that you have created. Only link a territory group or item (i.e. a country, a region and so on) by dragging it to the box on the left if it affects the price. For instance, to add 100% to the base price for world wide use, drag that item to link it and then enter the percentage.
Example: Group Region with details Benelux, Scandinavia, English speaking countries and so on.
NOTES
- Don’t forget to click save on every tabsheet before you move onto the next tabsheet or to another use.
- You can add percentages and fixed amounts. E.g. 20 Euro or 20%.
- You can also add negative amounts or percentages. E.g. -10% for a certain size will lower the base price by 10%.
- You can apply all the settings from one specific use to all other uses within the same group.
Step 5 – Test the calculator and pricing
When you are done with the above steps – or if you want to test your settings before you are finished – click Test calculator in the bar on the left. Select a use and a use detail in the drop down boxes at the top. Alternatively you can enter (part of) a use and press enter to retrieve suggestions. Then click on one of the suggested uses to have it automatically applied.
The parameters that appear underneath depend on what you have configured. Select values for the different options (e.g. size, print run, duration et cetera) to see what price is calculated.
Step 6 – Publish your changes
You can change all the settings without affecting the “live” price calculator. When you are done, click Publish calculator to copy all its settings and make the new version available on the client facing pages.
Styling the client facing price calculator
You can apply custom CSS to change the appearance of the price calculator dialog. The main container is #pricecalculator.
If the user clicks the Save button (or the Submit button when in Quote mode), all inputs that are not yet selected will get the class “problem” added to indicate that values for these inputs are required. By default, a maroon border is added. To change this, use the Code editor and add your own CSS. The class is automatically removed from each of the inputs as soon as a value is entered or selected in the dropdown.
Manipulating the calculator with custom script (not for Flex websites)
In version 31.3 or later you can add a JavaScript object to the custom script in the code editor. The object name must be “xspricecalculator”. The object can have the following methods:
- onpricecalculator(): This function is called by the internal displaycalculator() function, before the calculator is displayed and before any of the calculator data is loaded.
- onready(): Called after the data is loaded. The function receives a callback parameter that you must call in your object after your own script is done.
- onapplieddata(): Called when the calculator is opened after applying the stored data for an order detail for which a price has been previously calculated.
- onusechanged(): Called after the “use” dropdown has changed.
- onusedetailchanged(): Called after the “use detail” dropdown has changed.
- onbeforesave(): Called when a user clicks the Save button. It receives a callback parameter that you must call in your object.
- ongetpricingdetailshtml(data): Called before generating the HTML to display the calculator details on e.g. the cart page. This function received the JSON data as a parameter and you must also return the data. This allows you to manipulate the JSON data that is used to generate the HTML.
- onafterdisplaypricedetails(): Called after the HTML has been generated and displayed – for all details – on the page (see ongetpricingdetailshtml).
Example:
You don’t have to add all available methods if you add the “xspricecalculator” object. In many cases it may be sufficient to just use the “onready” method. Example code is available in the code editor.
Price calculator implementation for Flex websites
Required script
The Infradox price calculator script is loaded on demand. I.e. the script loads when a user clicks a button to open the price calculator dialog. Therefore you will need to add the following code to the code editor (template 87):
Remember to enable the script too (tick the “Enable” checkbox at the top when you save your code).
The above script is then automatically included on pages where the calculator can be used, i.e. the preview page, the modal preview dialog and the cart page.
The init() function is called when a user clicks on the price calculator button, it sets all the required parameters and loads the calculator html and the Infradox calculator script with an Ajax call. The object “xscalculator_” is part of the Infradox script library, and it’s invoked with a call to “xscalculator_.init(p)”. The variable p is a JSON object that is created in the init() function above.
Optional calculator script to change default behavior
If you want to customise the calculator, you can add the “xscalculatorhandler” Javascript object to template 87 in the code editor. This object has the following functions:
Remove the functions that you do not need from the above script. Note that you can add your own custom functions to the xscalculatorhandler object.
Example script that moves three countries to the top of the list if the parent selection is changed to “country”.
Displaying calculator data and prices on preview pages
To display the data and pricing information on previews (pages or modal previews) of files that have already been priced, you’ll need to add the function “pricedfilehtml” to the Javascript object “xspreviewhandler”. This handler needs to exist in code editor template 86.