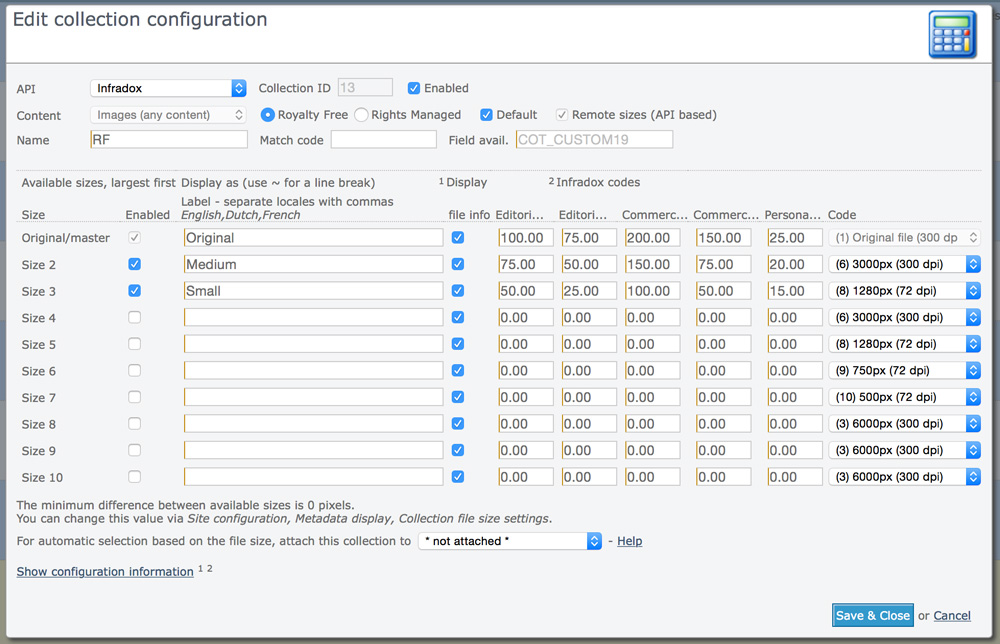
The price of RF image files is by default determined by the size of the file that a user wants to buy. In XS version 29, it is possible to create multiple RF licences. This article explains how you can configure this option.
Recommended reading: Website constants, File collections and download sizes, Displaying file details, sizes and prices and Linking files to suppliers.
Edit the licence names
First, you need to change the names of the licences that you want to make available. The names are defined in the constants file constants-rf.txt. Go to Site configuration and click on Constants in the sidebar. Find the file constants-rf.txt in the dropdown box and click on its name. The file has the following constants:
pricelabel0=Editorial online
pricelabel1=Editorial print
pricelabel2=Commercial online
pricelabel3=Commercial print
pricelabel4=Personal use
The values for the above labels are just examples. You can use 5 different licences for which you can configure different prices. If you want to use fewer options, then enter a – as the value. For example, if you don’t want to use the 5th one then use
pricelabel4=-
The value – will automatically hide the licence on the client facing pages. You must also check the box above the columns that you want to use.
Editorial and Commercial licences
The fist two columns are reserved for Editorial type licences, and the second two columns are reserved for Commercial type licenses. For example Editorial Print, Editorial Online, Commercial Print and Commercial Online. The fifth column is reserved for a generic/other licence. Note that this is only relevant if you want to automatically make licences unavailable if a file is only available for Editorial or Commercial use.
When you are done, click Save local copy.
If you website uses multiple locales, then make sure to edit the constants files for each locale.
Entering prices
In the administrator dashboard, click on Price calculator. Then click File collections in the sidebar. Either create a new RF collection, or edit an existing one. In the properties dialog, you’ll see 5 price columns for each file size.

The labels above the price columns are the names that you have entered in your constants files. Hover over the column name to display the full name. You can now enter prices for each of the licences. On the client facing pages, the user will be able to select both a licence and a file size. The combination of both determines the price. When you are done click Save at the bottom of the dialog. If you have other RF collections, then edit the prices for those as well before you continue.
Enabling multiple licences on the client facing pages
Once you are done with the actions described in the previous paragraphs (all options must have prices), you can enable the function. Go to Site configuration and click on Metadata display in the sidebar. Then open the section Collection file size settings. Check the box Use multiple pricing option and click Save at the bottom.
Using custom templates
If you want to change how the “select licence” options appear on the client facing pages, then you can create custom page fragments. This requires skills in HTML, Javascript/JQuery and CSS. There are custom template options for the version used on preview pages (also the modal preview) and for the cart.
Recommended reading: Using Javascript, Infradox XS Customisation, Using the code editor.
Here’s how to customise the template used for previews. Go to the code editor and in the dropdown at the top, select “RF multi licence head (66)” in the “preview” group. Click on Load example and select the first file in the dialog. Then click Use code. The default code – shown below – will show in the editor. This fragment is inserted into a table. It has two rows and the Javascript that handles when a different radiobutton is selected (to choose a different licence option). If you understand the Javascript, then you can change the code as required. You don’t have to use radiobuttons but you do need to make sure that your script updates the attribute “priceoption” when a user selects a different option.
Note that the HTML uses classes that will automatically hide any of the licence options that you don’t want to use (the ones with a – value in the constants file as explained above).
Preview pages and modal previews
To change the code fragment used on the cart page, select file 67 in the group “Cart page fragments”. The HTML and script have xs tags to show the selected option and price.
The XS Javascript handles changes (i.e. when a different option is selected). It also cartpage.cartpricing() which will display updated prices at the bottom of the cart.
However, if you want to use a custom fragment for the cart page, then you will have to add a Javascript object to the client script in the code editor.
Cart page
And an example of the script that you must add to the code editor:
