
The gallery manager can be used to build hierarchical categories to help your users find images. The categories are then used to execute predefined search queries – as opposed to displaying actual galleries. The above screenshot shows an example.
The Infradox gallery structure is three levels deep. I.e. there are so called top levels, in which you create groups. And the groups contain galleries – although when you are configuring a top level for category searches, you’ll be adding only one photo to each gallery. This photo can be used for representation purposes – within XS this is called an index thumbnail. You can display separate pages for your search categories, but you can also list categories e.g. in the page footer, on your home page and so on.
For more information about Gallery management, read Gallery management.
Other related articles: Custom Gallery Root page, Gallery Set editor, Gallery features page, Gallery processing.
The Gallery manager
The gallery manager function is integrated in the client facing pages. You need to be logged in with an administrator account with sufficient permissions and you must have enabled the administrator toolbar (usually via the My account dropdown menu). In the toolbar, click on Gallery manager.
Creating a top level for search categories

In the panel on the left, click on add root level. This will display the properties of the new top level that you are about to create. Change the dropdown for Root level style to Categories. In the above screenshot, you see an arrow telling you which drop down you need to open. You also see orange help links next to the options. Click on a link to get more information about a particular option. For now, you can leave the default settings as they are. Enter a title (e.g. Category galleries) in the input box and then scroll down in the panel and click the save button to create the top level.
Adding groups / Categories
The panel will now display your new root level in orange. Click on it to expand it and then click on Add group. In this context, each group represents a search category. Add your first group by entering a group/category name and click save. Repeat this process until you have created all the categories that you need.

The above screenshots shows the top level container and all of its groups/categories underneath. The green icon on the right of each category indicates that the group is visible on the client facing pages. However, groups will not show on the default category pages until you have created subcategories (galleries) in a category (group).
Adding galleries / subcategories
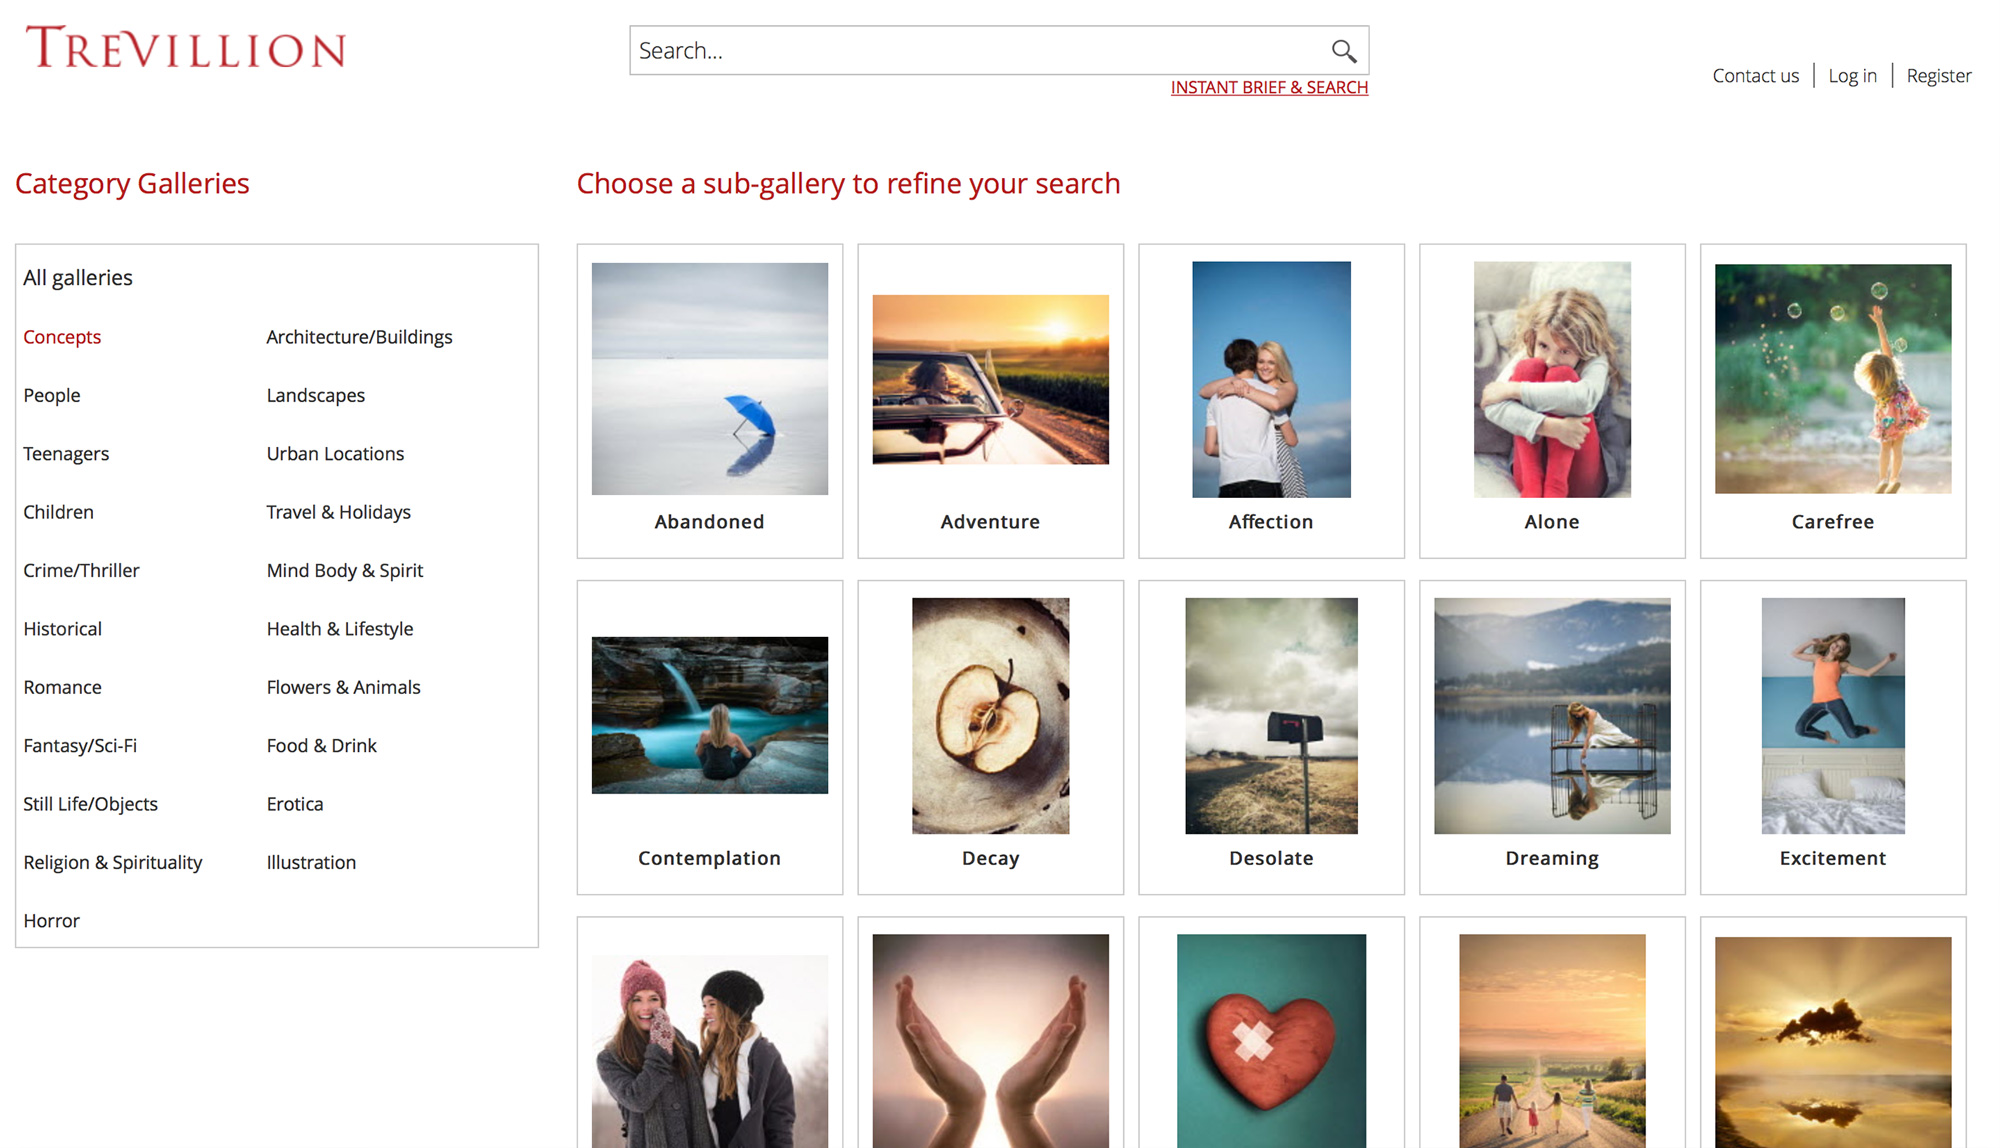
Within each group you can now start to create galleries. In this context each gallery is a subcategory. You’ll need to select one thumbnail to each subcategory and you’ll need to specify a search query to execute.

The above screenshot shows subcategories that are created in the group Concepts. A thumbnail has been assigned to each subcategory. To edit a subcategory, click on it in the panel on the left, or on its thumbnail which is displaying in the large panel on the right.
To add a subcategory, click on the small arrow in front of a group name in the panel on the left. This will expand the group, showing its subcategories and the available options. Click on the add gallery link to create a new subcategory. The panel on the left will show the properties. You can do this also by clicking on a group name and then on the Add gallery button in the main panel.

- Enter a subcategory name in the Title input box. Note that this name is displayed on the client facing pages, but it is not the actual search that will be executed when someone clicks on it.
- Add a thumbnail to your subcategory. You can load thumbnails in the bottom panel, e.g. from one of your lightboxes, recent uploads, or by simply search for images as shown in the screenshot. Then click on the thumbnail that you want to use in the bottom panel to add it. It will be automatically selected as the index thumbnail. If there are more thumbnails added to a subcategory / gallery, then you can drag a thumbnail from the main panel to the box in the properties panel on the left.
- Enter a search query in the box “Query or URI”. Below is an explanation about how you can create search queries but you can click on the icon next to the input box to open the query builder dialog – which lets you create complex search queries by simply entering words in the dialog inputs. When you are done scroll down in the panel and click save.
Search query help
- Boolean queries
You can use brackets and Boolean operators AND, OR, AND NOT, NEAR to create Boolean queries.
For example (cat or dog) and park and not woman – but use +instead of a space. E.g. (cat+or+dog). - Multiple character wildcard
You can also use wildcards but note that the use of wildcards may increase search time on large databases.* The asterisk wildcard (matches multiple characters):
For example walk*, will find walk, walks, walking, walker and so on.
For example ba*g, will find balancing, bathing, barking and so on. - Single character wild card
? The question mark wildcard (matches single characters).
For example c?t, will find cat and cut but not cats or cuts - Display as
You can use the ^ character to display something, while searching for something else.
However, you must not use this if you are creating search categories.^apple=pear will search for apple but it will display that it searched for pear on the client facing pages.
This can be used to search for instance for supplier codes while displaying the supplier’s name.
^@sup8821=James Hunter will search for supplier code @sup8821, but it will display James Hunter as having been searched for on the client facing pages. - URI
When you are not creating search categories, you can enter a URI instead of a search query – for instance to browse a contributor’s files.
E.g. /contributor/browse/123/photographer-name
where 123 must be the contributor id and photographer-namethe name to display on the URL.
URI’s must start with a forward slash (/). You can only use URI’s if the top level root style is “Default”.
Search filters
You can add filter codes to the category root level, to its groups and to the galleries / subcategories. All codes – from the root level, the group/category and the gallery/subcategory – are combined and applied to the search. Make sure not to use conflicting codes on different levels in your hierarchy. Filter codes are case sensitive.
If you want to specify more than one filter code, then use commas to separate your codes.
E.g. f6=I,f2=RM for Media: Images and Rights: RM.
Standard filters
You can use the standard filters as listed below:
- f0: Orientation, possible values V H P S – for example f0=VS filters for Vertical and Square files
- f1: Color, possible values CC CB
- f2: Rights, possible values RM RF
- f3: Release, possible values MR PR
- f4: Licence type, possible values CR ED
- f5: Image type, possible values P L
- f6: Media, possible values I F
Custom filters
You can use f10 up to f19 for any of your ten custom filters. The possible values depend on what you have configured.
Search category URL’s
The URL’s to display the results of a category search have the form:
/category/[category-name]/[subcategory-name].html
for example:
/category/concepts/abandoned.html
The XS system will lookup the correct subcategory by the category and subcategory name. The gallery manager shows the URL at the top of the dialog. There’s a test link next to it that you can click to open the results in a separate browser tab.
Listing categories on pages
You can list your category names in custom templates with the dbhtml() function. Below is an example:
The database procedure that is used in the above example (sp_gallerytitles) has parameters that you need to provide values for, shown in square brackets below:
sp_gallerytitles [toplevelid],languageid,subdomainid,userid,userac,userdc,[groupsorgalleries],[menuid]
[toplevelid] this is the id of the root level that stores your categories and subcategories
[groupsorgalleries] 0 for all, 1 for categories only, 2 for subcategories only
[menuid] the id of the main menu item that you want to highlight
The other parameters must stay unchanged, those are automatically replaced depending on the user’s permissions.
For more information about using this function, read the article Using SQL in your pages.